Generating Self-Signed certificate for iOS 13 / macOS 10.15
by Lukas Kukacka
iOS 13 / macOS 10.15 introduced new requirements for self-signed certificates, which might cause your old self-signed certificates (or new ones without proper configuration) to just stop working after updating devices.
The new requirements are documented at Requirements for trusted certificates in iOS 13 and macOS 10.15.
Most of the requirements are clear and your certificates probably already satisfy them. We have to, however, make sure to satisfy especially the following ones:
- TLS server certificates must present the DNS name of the server in the Subject Alternative Name extension of the certificate. DNS names in the CommonName of a certificate are no longer trusted.
- TLS server certificates must have a validity period of 825 days or fewer (as expressed in the NotBefore and NotAfter fields of the certificate).
or simplified:
- Certificate must explicitly list all domain names and/or IP addresses it is issued for
- Certificate cannot be issued for longer then 825 days
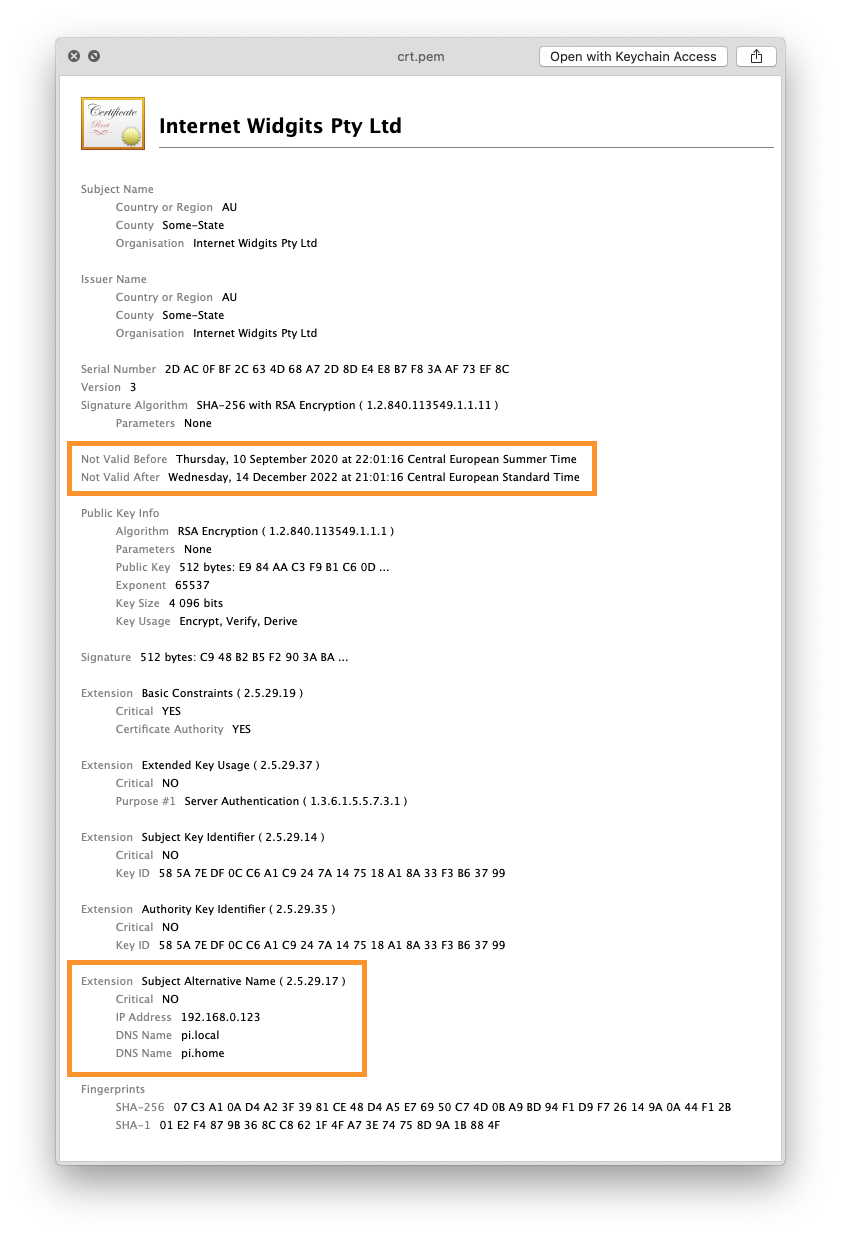
What we needs looks something like this…
Prepare OpenSSL command to create certificate
Using OpenSSL it is actually quite easy to generate such certificate
openssl req -x509 -nodes -days 825 -newkey rsa:4096 \
    -addext "subjectAltName = LIST_OF_DOMAINS_OR_IPS" \
    -addext "extendedKeyUsage = serverAuth" \
    -keyout key.pem -out crt.pem
where LIST_OF_DOMAINS_OR_IPS must be replaced with comma-separated list of domains and/or IP addresses for which the certificate will be issued. There can be multiple IP address and domain names provided.
Each value is either:
- Domain in format
DNS:domain.tld(e.g.DNS:lukaskukacka.com) - IP address in format
IP:NNN.NNN.NNN.NNN(e.g.IP:192.168.0.123)
Some real world examples. The whole line 2 of the command would look like this:
-addext "subjectAltName = DNS:lukaskukacka.com" \- Single domain
lukaskukacka.com
- Single domain
-addext "subjectAltName = IP:192.168.0.123,DNS:pi.local,DNS:pi.home" \- Raspberry Pi available on LAN with IP address
192.168.0.123and domain namespi.localandpi.home.
- Raspberry Pi available on LAN with IP address
Try to create certificates - and fail!
Let’s give it a try
openssl req -x509 -nodes -days 825 -newkey rsa:4096 \
    -addext "subjectAltName = IP:192.168.0.123,DNS:pi.local,DNS:pi.home" \
    -addext "extendedKeyUsage = serverAuth" \
    -keyout key.pem -out crt.pem
the command will actually fail with error like this:
unknown option -addext
req [options] <infile >outfile
where options  are
 -inform arg    input format - DER or PEM
...
Wait, what? The problem is OpenSSL used by macOS. On macOS (Catalina 10.15.3 at the time of writing this post) the OpenSSL is actually LibreSSL.
$ which openssl
/usr/bin/openssl
$ openssl version
LibreSSL 2.8.3
And the option we need, -addext, is available only from LibreSSL 3.1.0 (see Release notes).
Installing “proper” OpenSSL using Homebrew
We can easily get the “proper” OpenSSL using Homebrew. Make sure you have Homebrew installed and execute
brew install opensslRun again with Homebrew version of OpenSSL
Let’s give it a shot one more time…
/usr/local/opt/openssl/bin/openssl req -x509 -nodes -days 825 -newkey rsa:4096 \
    -addext "subjectAltName = IP:192.168.0.123,DNS:pi.local,DNS:pi.home" \
    -addext "extendedKeyUsage = serverAuth" \
    -keyout key.pem -out crt.pem
Great, that seems to work! You will see the usual “Generating a RSA private key” and you will be asked to fill the certificate details.
$PATH). I chose the one I found simplest: calling the OpenSSL binary from its location.
Done 🎉
You will find key.pem and crt.pem in your folder.
You can check the certificate now (QuickLook is enough) and if everything went fine, you will see the new “Extension: Subject Alternative Name” with all your domains and IP addresses in the certificate as highlighted in the screenshot above.
Where next?
Check out the follow-up post about Installing Self-Signed certificate to iOS 13 / macOS 10.15.
Like the article, got a comment or found an issue? Get in touch via Twitter .
Subscribe via RSS

